
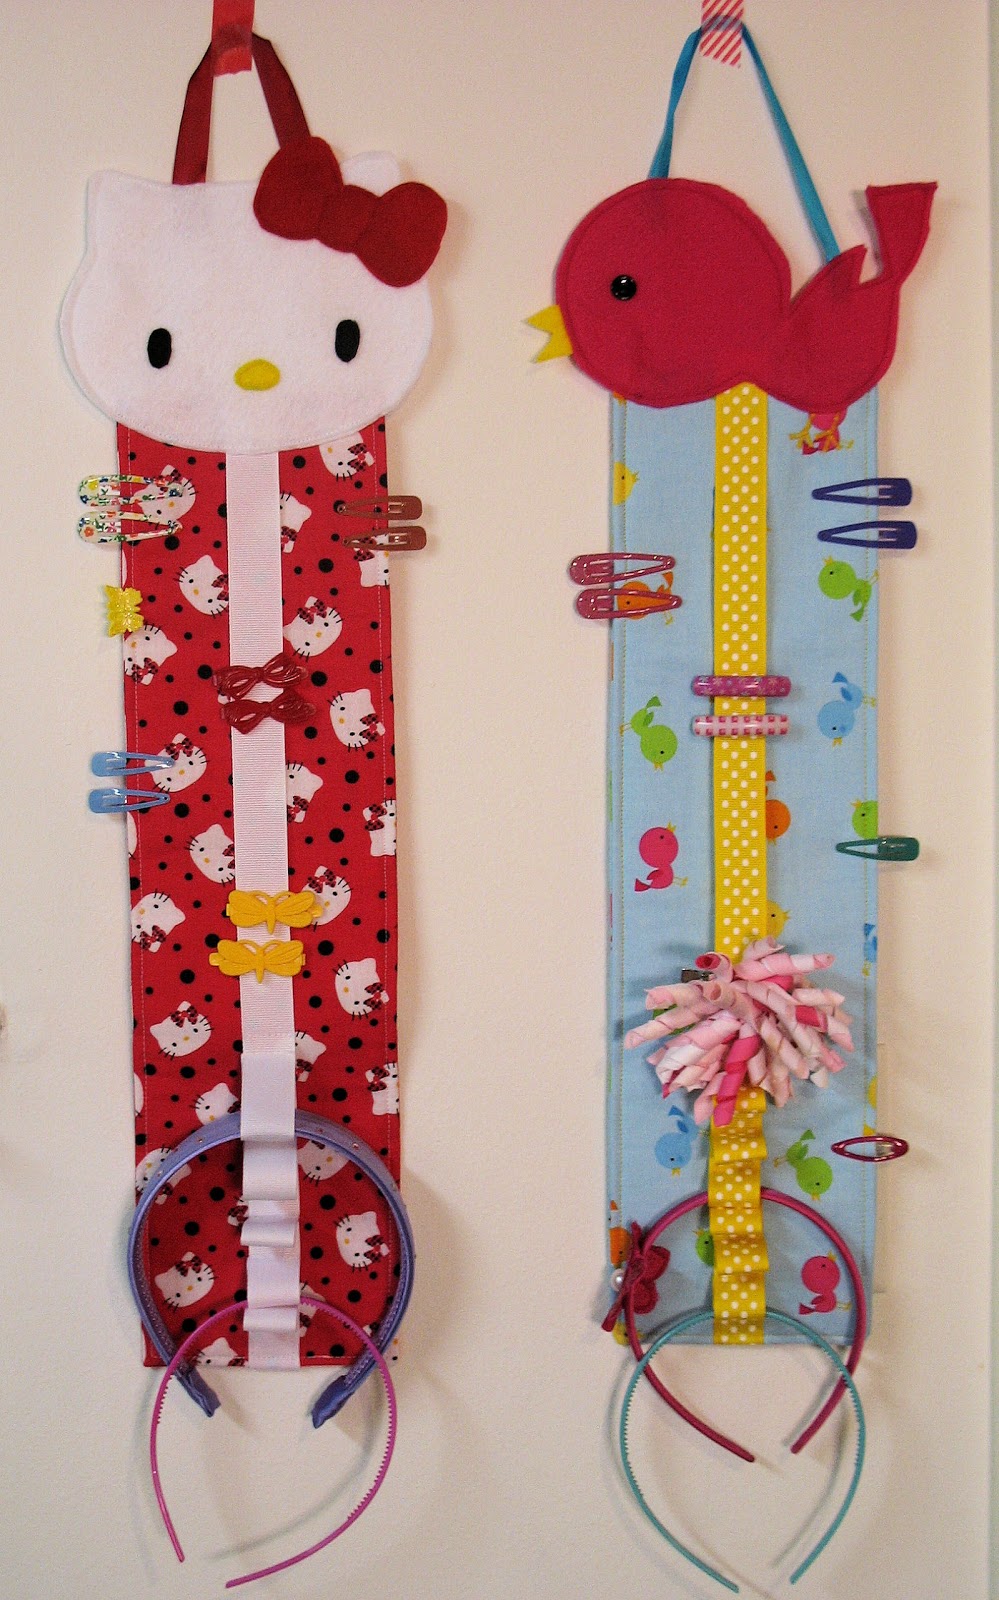
I have my first tutorial today! I hope you like it! I've been thinking about something like this for quite awhile. It was actually easier than I thought! :) If you have a daughter this might be a great way to clean up the clips and headband clutter. For this project I decided to make a Hello Kitty and a bird design. You could do any kind of design or just leave it plain and have a rectangle. I have provided the templates for the bird HERE and Hello Kitty HERE.
They are nice hangers and hold quite a bit depending on how long you make them. I decided to make mine 18" long. Let's get started!
You will need:
a piece of fusible fleece 5" x 18"
2 rectangles of fabric 5 1/2" x 18 1/2"
scraps of felt depending on your top design. (for Hello Kitty you'll need 2 white 9"x12" sheets)
1 button for the bird only
Ribbon: This an estimate because it depends on how many headband loops you make, but 1 yard for the center and then a quarter yard for the hanger part should be enough.

Start by cutting your fusible fleece and main fabric out.

Then iron your fusible fleece onto the back of 1 piece of fabric. Remember the rougher side (where the glue is) goes away from the iron! See how by cutting the fleece a bit smaller you have an edge. This will help with turning and provide a guide when sewing.

Switching over to the ribbon now. You'll want to decide how many headbands your hanger is going to hold and how big they are. For the skinny ones make a loop about 1" and sew as shown below. For wider headbands like in the second picture, make the loop about 2". To determine how long for the ribbon I started with about 30". That will let you make about 6 loops. You can always trim off the excess when done.


This is what your ribbon will look like before it is attached.


Then lay the ribbon out on the fabric with the fusible fleece on the back. Center and pin the ribbon down.
Now you don't want to sew down the ribbon sides because then you couldn't attach any clips. You just want to baste at the top and bottom of the ribbon and sew across the top and bottom of the headband area as shown below.


Ignore the top stitching you see in the second picture. I got ahead of myself, luckily I was able to seam rip at the bottom and get the ribbon tucked it!
You are now ready to put the front and back together. Yeah!
Take the two pieces and pin them together.

Leaving the top open, sew around the other 3 sides using a quarter inch seam width.

Then trim the corners off and turn right side out. And iron out nice and flat.


We are now ready to attach the top piece. Cut out your pieces. For Hello Kitty you need the red bow, 3 white face pieces (I'll explain why 3 below), 2 black eyes and 1 yellow nose.
For the bird (not shown) you'll need 2 of the bird and 1 of the yellow beak.


Here she is! I then sewed down the eyes and nose. Don't do the bow yet! I did and it is a bit tricky to sew everything together, so do it last!!

Here is why I suggest 3 pieces of felt for Hello Kitty. See in the first picture that is just a front and back, you can see the red underneath. I added a second top piece under the main one and that looked better. For the bird or any other dark felt colors I think a front and back is enough.


Now pin it down and don't forget to add in the ribbon for the hanger. I eyeballed it and made it about 7" long. For the bird I had to do 9".

Sew all the way around her face, enclosing the ribbon and bottom hanger part! Then add the bow at the end. If you are making the bird use the template to figure out where the eye goes and then sew it on. I also added little feet with a zig zag stitch for an added touch. Now you are done!

Admire your cute work! :) Then load it up!


I hope you are inspired to make one! :) If you liked this or have a question please leave me a comment!
Thanks!
Howdy! This post could not be written much better! Looking at this article reminds me of my previous roommate!
ReplyDeleteHe continually kept preaching about this. I will forward this post to him.
Pretty sure he will have a good read. I appreciate you for sharing!
Feel free to surf to my website - gsa search engine ranker
Amazing and creative ideas for a accessory organizer. Completely amazed with it. Keep sharing similar articles.
ReplyDeleteme encanto
ReplyDeleteThis comment has been removed by the author.
ReplyDeleteI made one tonight for a little girl from my church, since I don't have any granddaughters to sew for! Thanks for good instructions. It was fun.
ReplyDeleteharika olmuş...elinize sağlık.
ReplyDeletemerci pour le tuto , votre idee est genial, je le fais pour ma petite fille, juste a la base je rajoute une pochette
ReplyDeletebonne journee
i read a lot of stuff and i found that the way of writing to clearifing that exactly want to say was very good so i am impressed and ilike to come again in future.. 加熱菸
ReplyDelete